Getting Google AdSense approval is a milestone, but it can lead to a traffic drop. Common reasons are: Google Analytics errors, algorithm changes, and technical issues. Ensure your Google Analytics code is correctly integrated. You’re not alone many face this issue, but addressing these factors can help restore your website traffic.
Table of Contents

Why Your Website Traffic Fell After AdSense Approval 9 Reason
1. Google Analytics Errors
The first thing you should check if your website traffic shows zero is whether Google Analytics is correctly tracking your site. Sometimes, errors or misconfigurations in Google Analytics can cause it to display incorrect data, making it seem like your traffic has dropped when it hasn’t.
Solution:
- Check the Google Analytics code: Ensure that the Google Analytics tracking code is correctly placed in the header of your website. It should be included in every page you want to track.
- Reconnect Google Analytics: If the code is missing or incorrectly placed, re-add it to your site. You can also reconnect your site with Google Analytics to ensure everything is set up correctly.
- Verify Data Collection: Use Google Tag Assistant or the real-time reporting feature in Google Analytics to confirm that data is being collected properly.

2. Changes in Site Speed
Adding AdSense ads can slow down your website, especially if you haven’t optimized for speed. Slow-loading pages can lead to higher bounce rates, meaning visitors leave before the page fully loads.
Solution:
- Optimize Your Website’s Speed: Use tools like Google PageSpeed Insights or GTmetrix to identify areas where your site can be sped up. This might involve compressing images, leveraging browser caching, and minimizing CSS and JavaScript files.
- Consider Lazy Loading: Implement lazy loading for images and ads so that they only load when they come into the viewer’s screen, reducing initial load time.
The best plugin for WordPress to increase site speed
When it comes to speeding up your WordPress site, you have a couple of excellent options. Let’s take a look at them:
- WP Rocket: WP Rocket is a premium caching plugin that offers robust features like page caching, minification, GZIP compression, and browser caching. It’s known for its effectiveness in optimizing website speed.
- LiteSpeed Cache for WordPress (LSCWP): LSCWP is a comprehensive site acceleration plugin that includes a dedicated server-level cache. It supports WordPress Multisite and works with major plugins like WooCommerce, bbPress, and Yoast SEO. LSCWP can substantially improve your website’s speed and performance.
Remember, the best choice depends on your specific needs and hosting environment. Consider testing both options to see which one works best for your WordPress website! 😊🚀.
How to increase site speed with LiteSpeed Cache
Before optimizing your website, you must create a backup file of your website. LiteSpeed Cache is an excellent choice for optimizing your WordPress site’s speed. Let’s get started:
- Install LiteSpeed Cache:
- Log in to your WordPress dashboard.
- Go to the LiteSpeed Cache section in your navigation menu.
- Set the Enable Cache option to ON. This will start caching your site’s content.
- To increase site performance, you can use presets. There is a preset option in LiteSpeed Cache.
- Configure Settings:
- Scroll down to customize other settings as needed. You can adjust cache settings, page optimization, and image optimization.
- QUIC.cloud CDN (optional):
- Set up the QUIC.cloud CDN if you want to further enhance performance.
- Fetch static content via a CDN for faster delivery.
Remember, LiteSpeed Cache can significantly boost your site’s speed and improve the user experience! 😊🚀

3. Poor ad placement
Ads that are intrusive or disrupt the user experience can drive visitors away. If ads are placed in a way that interferes with navigation or content consumption, users might be less inclined to stay on your site.
Solution:
- Strategic Ad Placement: Ensure ads are placed in a non-intrusive manner. Avoid placing ads where they can obstruct content or essential site elements.
- Follow best practices: Use AdSense’s recommendations for ad placement to enhance the user experience without sacrificing too much revenue.
How can I optimize my website’s ad placements in Google AdSense for better revenue?
Optimizing your Google AdSense ad placements is crucial for maximizing revenue. Here are some effective strategies:
- Balancing the customer experience:
- Consider both high-performing ad units and the user experience.
- Optimize placements without compromising user satisfaction.
- Place ads where they enhance the content without overwhelming visitors.
- Viewability and Engagement:
- Ensure ads are above the fold (visible without scrolling).
- Use vertical ad sizes (especially on desktop).
- Create engaging content to increase viewability.
- Switch fixed-sized ad units to responsive ones.
- Experiment and analyze:
- Run experiments to compare ad settings.
- Let Google optimize your ad format settings.
- Analyze the data to refine placements and formats.
Remember, the right balance ensures revenue growth while maintaining a positive user experience! 😊📈🌐
What are some common mistakes to avoid with Google AdSense placements?
When it comes to Google AdSense ad placements, avoiding common mistakes is essential for maximizing revenue and maintaining a positive user experience. Here are some crucial factors to keep in mind:
- Keep Your Ads Looking Like Ads:
- Avoid matching photos with your ads or having nearby content follow their formatting.
- The AdSense Program’s policies prohibit displaying advertisements using these methods.
- Call Them What They Are:
- Use labels like “advertisements” or “sponsored links” for your ad units.
- Avoid misleading headings that may confuse users.
- Optimize ad sizes:
- Google can automatically optimize ad sizes on mobile.
- Choose ad unit sizes for the best performance without modifying the ad code on your pages.
- Less can be more.
- Place a combination of ad units, link units, and search boxes on each page.
- Avoid cluttering your page with too many ads, as it may harm the user experience.
Remember, thoughtful ad placement enhances revenue while ensuring a seamless user journey! 😊📈🌐

4. Increased Bounce Rate
What is the bounce rate?
Bounce rate is a metric used in web traffic analysis. It represents the percentage of visitors who land on a page or screen and then leave without engaging further. Specifically, a session is considered a bounce if it doesn’t last longer than 10 seconds, trigger a conversion event, or include a second pageview or screenview. In other words, these visitors “bounce” away from your site without exploring additional content or taking any meaningful action.
Solution:
- Improve Content Quality: Ensure your content meets user expectations and provides real value. High-quality content can keep visitors engaged and reduce bounce rates.
- Monitor and Adjust: Regularly monitor your bounce rate and analyze which pages are most affected. Make necessary adjustments to content and ad placement to improve user retention.

5. Algorithm changes
Google’s search algorithm changes frequently, and your site might be coincidentally affected by an update around the time you implemented AdSense.
Solution:
- Stay Updated with SEO News: Follow SEO news and updates to stay informed about Google’s algorithm changes.
- Adjust SEO Strategies: Based on the latest updates, adjust your SEO strategies to maintain or improve your ranking.
6. Ad Blocking Software
Some users employ ad-blocking software, which might not only block ads but also interfere with website analytics, leading to inaccurate traffic data.
Solution:
- Encourage Whitelisting: Encourage users to whitelist your site by explaining the value of ads for your content creation.
- Use Ad-Block Detection: Implement tools that can detect ad blockers and prompt users to disable them for your site.

7. Technical Issues
There could be technical issues that arose during the AdSense implementation, such as coding errors or conflicts with other site scripts.
Solution:
- Review Website Code: Thoroughly review your website’s code to ensure there are no errors. Use browser developer tools to identify and fix any script conflicts.
- Conduct Regular Audits: Regularly audit your website to catch and resolve technical issues promptly.
8. User Experience (UX) Problems
If the user experience has declined due to the introduction of ads, visitors may not return to your site.
Solution:
- Enhance UX: Regularly review and improve your site’s UX. This includes easy navigation, quick load times, and high-quality content.
- Gather User Feedback: Conduct user surveys to gather feedback on how ads are affecting their experience and make necessary adjustments.
10. Use SSL On Your Site
Using SSL (Secure Sockets Layer) on your website is crucial for multiple reasons, including security, trust, and SEO. Here’s a detailed look at why implementing SSL is essential and how it can benefit your site. SSL can improve Enhanced Security, Improved Trust and Credibility, Better SEO Rankings, Enhanced User Experience. Implementing a SSL Certificate Can Increase Trust & Traffic.
Introduction to SSL Certificates
An SSL certificate, also known as a secure Sockets Layer certificate, is an electronic certificate that enables safe, encrypted communication between a web browser (or client) and a web server. It is critical for maintaining data integrity, protecting privacy, and confirming user identities on the internet.
Best SSL Certificate Provider In WordPress & Which one Should You Use
- If you have a WordPress site, Really Simple SSL is excellent due to its simplicity and seamless integration.
- For non-WordPress sites, Let’s Encrypt remains a top choice for its widespread adoption and robust security.
How to Install the Really Simple SSL WordPress Plugin
Here’s a step-by-step guide on how to install the Really Simple SSL plugin in WordPress:
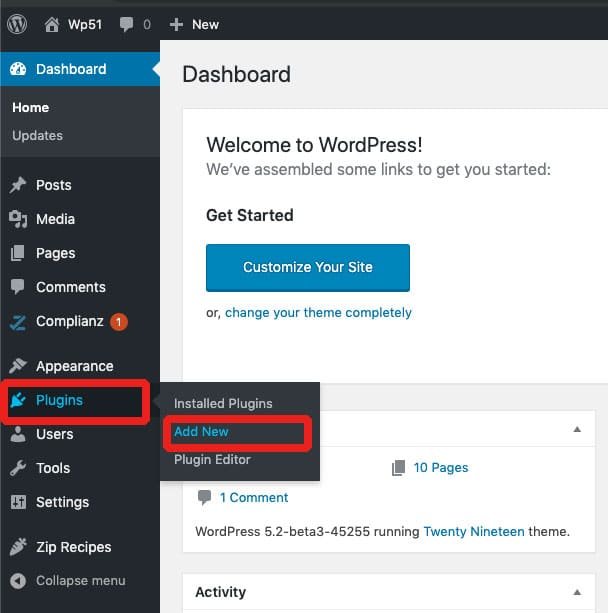
- Log in to your WordPress dashboard.
- Go to Plugins > Add New.
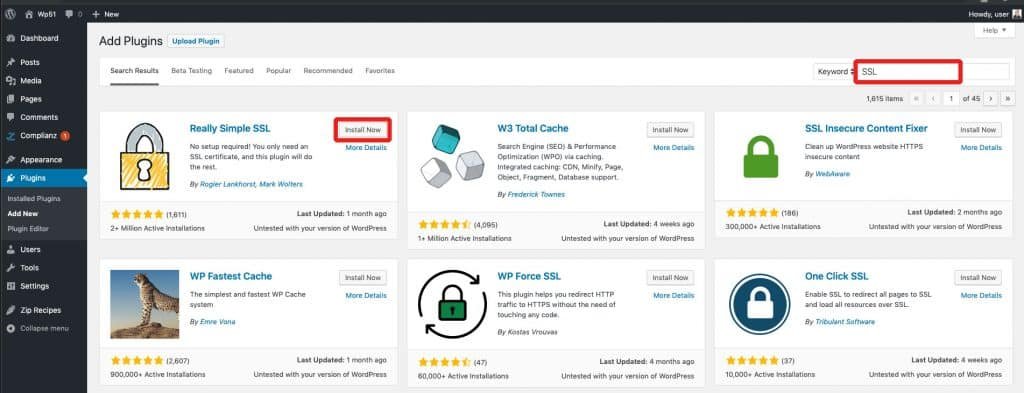
- In the search bar, type “Really Simple SSL.”
- Next to the Really Simple SSL plugin, select “Install Now.“
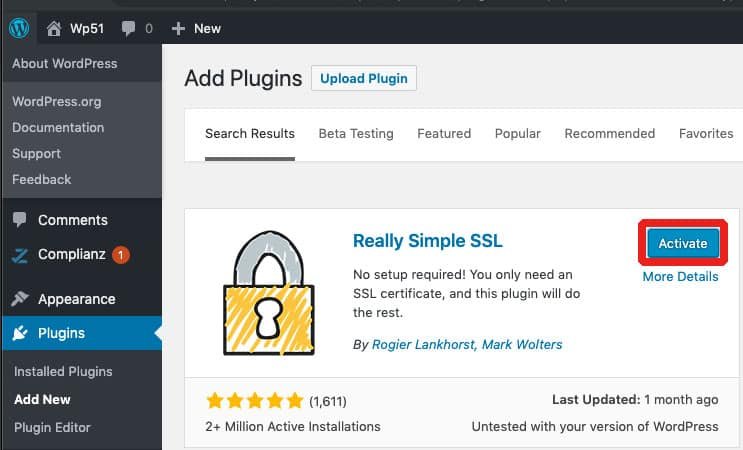
- To activate the plugin, click the “Activate” button at the end.


Most websites will work successfully with the plugin’s default settings. If you want to change the plugin settings, go to “Settings->SSL->Settings” and enable the 301.htaccess redirect.
9. Google Penalty
A Google penalty can be a daunting setback for any website owner. It can lead to a significant drop in search engine rankings and organic traffic, directly affecting your site’s visibility and revenue. Understanding the causes, consequences, and steps to recover from a Google penalty is crucial for maintaining a healthy online presence. You must check you got an google penalty or not
How I can check that my website is Penalized by google
If you suspect your website has been penalized by Google, there are numerous actions you may take to confirm this. Identifying a penalty early on is critical for taking the necessary actions to restore your site’s rating and traffic.
1. Check the Google Search Console.
Google Search Console (formerly known as Google Webmaster Tools) is a valuable resource for diagnosing potential penalties. Here’s how to use it:
- Manual Actions Report: Log into your Google Search Console account and go to the “Security & Manual Actions” area. Under “Manual Actions,” you may discover if your website has received a manual penalty. Google will provide information about the problem and actions to address it.
- Search Traffic: Check the “Performance” report to see if there’s a sudden drop in impressions or clicks. A sharp decline can indicate a penalty or an algorithmic change affecting your site.
2. Analyze organic traffic in Google Analytics.
Review your Google Analytics data for any sudden and significant drops in organic traffic. Here’s how to do it:
- Organic Traffic Report: Go to “Acquisition” > “All Traffic” > “Channels” and select “Organic Search.” Look for sudden declines in traffic over specific dates, which might coincide with a Google algorithm update or penalty.
- Comparative Analysis: Compare traffic data over different periods to identify if the drop is isolated or part of a broader trend.

How to Revive Website Traffic After Google AdSense Approval
Well done on receiving acceptance for Google AdSense! Even if this is a significant accomplishment, you should concentrate on growing your website’s traffic in order to optimize your AdSense revenue. The following tactics will assist you in increasing website traffic:
1. Produce High-Quality Content: Create engaging, relevant, and valuable content for your target audience. Regularly update your website with fresh and informative articles to keep visitors returning.
2. Enhance SEO: Optimize your website for search engines by using relevant keywords, meta tags, and clear titles. Improving your site’s SEO will increase its visibility in search engine results.
3. Leverage Social Media: Promote your content on social media platforms to reach a larger audience. Engage with your followers to build a community around your content.
4. Utilize Email Marketing: Develop an email subscriber list and send newsletters regularly. Use email campaigns to encourage subscribers to visit your website.
5. Network and Collaborate: Connect with other websites, bloggers, or influencers in your niche for potential collaborations. Guest post on other websites to reach a broader audience.
6. Optimize Website Design: Ensure your website has a clean, user-friendly design for a better user experience. Make sure your site is optimized for both desktop and mobile devices.
7. Consider Paid Advertising: Invest in paid advertising campaigns to drive targeted traffic to your website. Use platforms like Google Ads to reach a specific audience interested in your content.
8. Participate in Online Communities: Join forums, online communities, and discussion groups related to your niche. Share your expertise, answer questions, and promote your content subtly when appropriate.
9. Offer Incentives: Provide exclusive content, discounts, or giveaways to attract visitors. Run promotions or contests to generate interest.
10. Monitor Analytics: Use tools like Google Analytics to track your website traffic and understand user behavior. Analyze the data to identify areas for improvement and adjust your strategies accordingly.
11. Focus on User Experience: Make sure your website is easy to navigate, loads quickly, and is free of intrusive ads or pop-ups. A positive user experience will encourage visitors to stay longer and return to your site.
Building website traffic takes time and consistent effort. Focus on delivering valuable content, optimizing for search engines, and promoting your website through various channels. With persistence, these efforts will lead to increased traffic and higher AdSense earnings.
Conclusion
While a drop in traffic after AdSense approval can be concerning, understanding the potential causes can help you address and rectify the issue. By ensuring accurate data tracking, optimizing site speed, improving ad placement, enhancing content quality, staying updated with SEO best practices, and maintaining a positive user experience, you can work towards regaining and growing your website traffic. Remember, the key is to balance monetization efforts with maintaining a user-friendly website.
FAQ
1. Why might my website traffic fall after Google AdSense approval?
There could be several reasons for a drop in website traffic after Google AdSense approval. Some of the main causes include Google Analytics errors, changes in site speed, poor ad placement, increased bounce rate, Google’s search algorithm changes, ad-blocking software, technical issues, and user experience (UX) problems.
2. How can I resolve Google Analytics errors that may be affecting my website traffic data?
To resolve Google Analytics errors, ensure the Google Analytics tracking code is correctly placed in the header of your website. If the code is missing or incorrectly placed, re-add it to your site and reconnect your site with Google Analytics. Use Google Tag Assistant or the real-time reporting feature in Google Analytics to confirm data is being collected properly.
3. How can I improve my website’s speed after adding AdSense ads?
You can improve your website’s speed by using tools like Google PageSpeed Insights or GTmetrix to identify areas for improvement. Implement lazy loading for images and ads, compress images, leverage browser caching, and minimize CSS and JavaScript files. Plugins like WP Rocket and LiteSpeed Cache can also help optimize your website’s speed.
4. What strategies can I use to optimize my website’s ad placements in Google AdSense?
To optimize your Google AdSense ad placements, balance the customer experience with high-performing ad units, ensure ads are above the fold and use vertical ad sizes, switch fixed-sized ad units to responsive ones, and run experiments to compare ad settings. Analyze the data to refine placements and formats.


